Sometimes, even after extensive training, we forget about important features or ways of using a product. This leads to inefficiencies. The cause of that could stem from a variety of reasons, such as not being trained to start with or not using the tool every day and forgetting a few things we had previously learned.
We recognize that your SOC and security stack is not composed of only Stamus Networks products. So we will be publishing a series of blogs to help you re-discover some of the less-well-known capabilities of the Stamus Security Platform.
Note, this content applies to Stamus NDR, Stamus ND, and SELKS.
Make sure to bookmark this blog to enhance your Stamus Kung-Fu !
Pivoting from IDS Alert Metadata to Signature Details
For today's blog, we will explore a threat hunting activity and how to pivot from intrusion detection system (IDS) alert metadata to signature definitions which allows you to inspect the content of a signature and understand why an alert was emitted in the first place.
To make things concrete, I will suppose we found an interesting (i.e. unusual) HTTP User-Agent string in an IDS alert or we gleaned it from our favorite security blog. I'll be using the not-so-unusual user agent Mozilla/4 for demonstration purposes in this article.
The first step is to search for this specific HTTP User-Agent, or pattern, using Active Filters in the SSP Hunt interface.
Guided Threat Hunting Filters
There are multiple routes one can choose to create such a filter for "Mozilla/4".
One way is to use the Protocol dropdown option from the filter area and then choose "HTTP" and "User-Agent" as illustrated in the following screenshot.

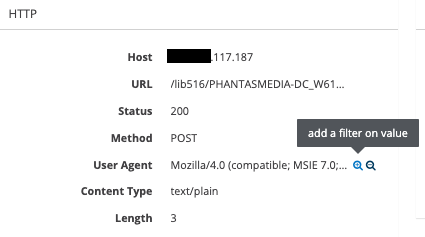
An alternative route, for example, is to select any existing HTTP alerts from the Alerts page, open it, and select the first HTTP User-Agent we see by clicking the "plus" magnifier next to it as illustrated hereafter.
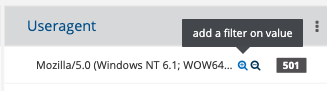
Another way is to select any HTTP User-Agents from the Dashboard page (section HTTP, card User-Agents).
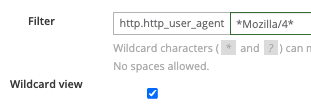
In both cases, we will end up with a specific User-Agent string set as an Active Filter. Then, we simply edit its value, and set the value we want to search for, here *Mozilla/4* in this example (don't forget to check the "Wildcard view" option if you are using wildcards!).
Finally, a fourth option is to use ES (Elasticsearch) Filters to directly input our search criteria, similar to the previous example. In that case, the field we are searching on is http.http_user_agent and the value we are searching for is *Mozilla\/4* (notice that the slash "/" is escaped with a backslash as Elasticsearch splits those characters)

With the first three approaches, we are using Stamus' proprietary search system on alert metadata and the final approach with ES Filters allows us to directly search the alert metadata indexed by Elasticsearch.
While each of these methods has their own pros and cons (to be described in more detail in a future 'Feature Spotlight' blog), they all lead to the same results, searching and filtering alert metadata fields for the specified pattern.
Pivot to Signatures
Any alert that matches our filter will be retained for the specific screen we are viewing (i.e. list of IDS alerts under the Alerts page, all metadata cards under the Dashboard page, etc).
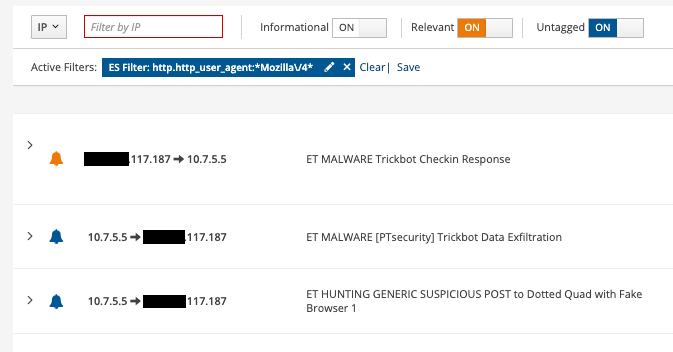
As we can see in the above screenshot, we have multiple signature messages, so multiple signatures led to the detection of this HTTP User-Agent and any signature will appear as many times as the number of IDS alerts we have (obviously this page is about seeing alerts!). This could be overwhelming if our goal is to identify all the involved signatures.
If we want to see the details of each signature, we can open each of those alerts and add the signature identifier (SID) as an active filter and then go to the signature page. But this is not really easy, and it is quite tedious when we have many matching signatures!
So, let's not change our filter and directly go to the Signatures page, which depending on your environment, may contain tens of thousand of rules. As we land on this page, we are presented with all the existing signatures, despite having our active filter set. Weird? No, logical!
If you remember the beginning of this blog, I wrote that active filters are used to search alert metadata, and here, we are looking at signatures (and their content).
To add the missing link between the alert metadata and the signatures, we must add a new filter to complement the existing one: Hits min equals 1.
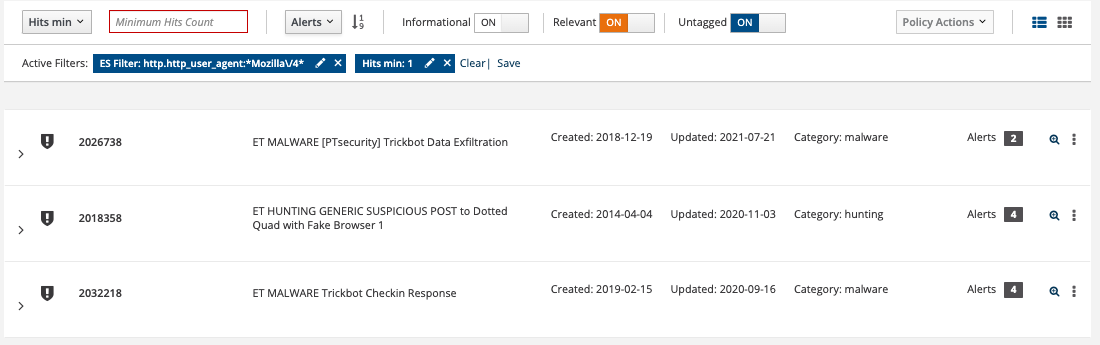
Here we go, we now have listed all the signatures that created at least one IDS alert (Hits min) having a Mozilla/4 User-Agent.
We can now open any of those signatures and review its detection logic.

Finally, note the number "2" in a black square on the right of the previous screenshot. This number tells us how many alerts were created by this specific signature.
Finally, thanks to Malware Traffic Analysis from which we gleaned a PCAP to illustrate this blog.
Happy hunting! And we’ll see you in the next article!